

巧设网络配置来解决Win7不能上网的具体步骤:
1、 右键点击桌面的右下角网络小图标。
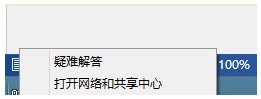
2、 单击打开网络和共享中心。在右上角有个更改适配器设置,在这里就可以看到你的网络连接状况。
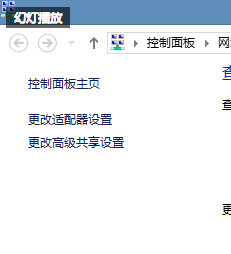
3、 单击更改适配器设置。这里显示了包括你的wifi的网络连接。

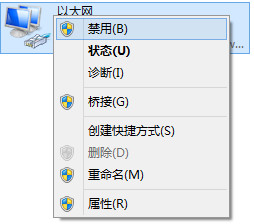
4、 在这里我们可以看到以太网网络连接,这就是你插入网线后显示可以上网的一个标识如果像上图一样就表明你已经断开连接了,这时要怎么处理呢。
5、 如何重新设置网络连接。右键点击以太网,然后点击禁用,当图标显示灰色的时候再右键点击,启用然后回到桌面,网络会重新配置,这样就轻松的解决了上不去网的困难。

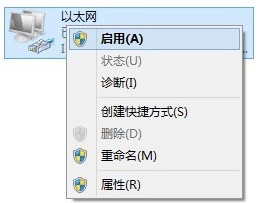

这样等待重新启用就可以了。这样就可以上网了,这种方法不仅适用于网线上网,同时无线上网也是同样适用的,步骤也和上述说明是一样的。
是不是很简单呢。当你发现你的Win7不能上网的时候,可以通过对电脑的网络设置进行巧妙地设置一下,那就可以轻松地上网了。如果有遇上不能上网的朋友,不妨试试上面的解决办法。


