关于wps页眉页脚怎么保存的问题解答
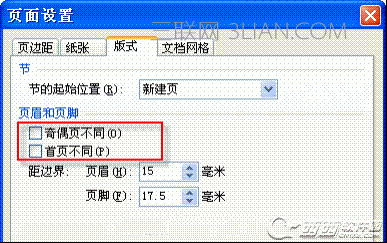
设置页眉和页脚时,可能会涉及到与“页面设置”和“域”的知识。影响到页眉和页脚的设置如下图:

2.1. 节、页面设置、页码域
节:通常以为文档的下一个对象是节(即Application->documents->Sections),页眉和页脚可以在不同的节中进行不同的设置。
页面设置:
奇偶页不同:此功能为方便设置类似于书籍的“页眉和页脚”,如字典。
首页不同:此功能为方便设置首页为封面而设置。(注:通常封面不显示页码)
域:如果在页眉和页脚中插入了页码域(即,如果你做了如下的操作:插入、页码,这样插入的页码就是一个域,与,在输入page是一样的域),则每页的页码会根据当前所在页而改变。
2.2. 读取页眉和页脚的内容
下面以页眉来介绍,页脚只要将Headers改为Footers即可,其他知识完全一样。
通常的方法是:
Activedocument.Sections(1).Headers(wpsHeaderFooterPrimary).Range.Text
注:这里的wpsHeaderFooterPrimary可以取得枚举值及描述如下:
名称 值 描述
wpsHeaderFooterEvenPages 3 返回偶数页上的所有页眉或页脚
wpsHeaderFooterFirstPage 2 返回文档或节中的第一个页眉或页脚
wpsHeaderFooterPrimary 1 返回文档或节中除第一页外所有页上的页眉或页脚
针对“页面设置”的不同,所以,对读取页眉中的内容细分如下:
2.2.1. 在页面设置中勾选了“奇偶页不同”
读取偶数页的内容:
Activedocument.Sections(1).Headers(wpsHeaderFooterEvenPages).Range.Text
读取奇数页的内容:
可以使用:
Activedocument.Sections(1).Headers(wpsHeaderFooterPrimary).Range.Text
注意:
如果页眉中设置了动态的内容,如第*页(“*”代表是一个根据页码自动更新的数字),则读出的内容:
这里与Word的差异:
1. Word:是根据当前光标的位置而定(如:光标放在第2页,则wdHeaderFooterEvenPages读出的是第2页的页眉内容,如果在第4页,则读出的是第4页的内容,如果光标在第3页,则读出什么有时是2页,有时是4页,规律不细说)。
2. WPS:读取的就是第一个匹配的页眉(如:wpsHeaderFooterEvenPages读的就是第2页的内容;wpsHeaderFooterPrimary则是第1页或者第3页的内容)。
2.2.2. 在页面设置中勾选了“首页不同”
读取第一页的内容:
Activedocument.Sections(1).Headers(wpsHeaderFooterFirstPage).Range.Text
读取除第一页的内容:
Activedocument.Sections(1).Headers(wpsHeaderFooterPrimary).Range.Text
2.3. 删除、修改页眉的内容
与上面同理,通常用(其他情况,请参考上面的方法):
Activedocument.Sections(1).Headers(wpsHeaderFooterPrimary).Range.Text="KingSoft"
3. 操作页眉中的图形或图像
3.1. 读取页眉中的图形或图像
读取页眉与页脚中的所有图形(不包含嵌入式图片):
Activedocument.Sections(1).Headers(wpsHeaderFooterPrimary).Shapes.Count
也可以用:wpsHeaderFooterFirstPage、wpsHeaderFooterEvenPages此处三个读出的结果完全相同。
读取在页面设置中勾选了“首页不同”中的页眉中的图形(不包含嵌入式图片):
Activedocument.Sections(1).Headers(wpsHeaderFooterFirstPage).Range.ShapeRange.Count
其他的偶数页等与其类似。
注意:
大多数情况应该使用.Range.ShapeRange.Count来操作图形。
3.2. 添加一个图形到页眉中且左对齐
注意:
以下代码仅供演示使用,不对可能存在的任何问题负任何责任。
要运行以下代码,必须满足两个文件:
1. 假设有C:tempafter.gif文件;
2. 已经可以切换到页眉与页脚中一次,即已有页眉与页脚信息,即至少有一个回车符,如下图(Word不需要这个条件)。

示例代码1:'添加图片到页眉中的且左对齐
Sub AddPicturetoHeaderToLeft()
Dim myleft, mytop
myleft = Activedocument.Sections(1).PageSetup.LeftMargin
mytop = Activedocument.Sections(1).PageSetup.HeaderDistance
Activedocument.Sections(1).Headers(wpsHeaderFooterPrimary).Shapes.Addpicture _
"C:tempafter.gif", Left:=myleft, Top:=mytop
End Sub
示例代码2:'添加图片到页眉中的且右对齐
Sub AddPicturetoHeaderToRight()
Dim myleft, mytop
Dim tempshape As Shape
mytop = Activedocument.Sections(1).PageSetup.HeaderDistance
myleft = Activedocument.Sections(1).PageSetup.PageWidth - Activedocument.Sections(1).PageSetup.RightMargin
Set tempshape = Activedocument.Sections(1).Headers(wpsHeaderFooterPrimary).Shapes.Addpicture _
("C:tempafter.gif", Left:=myleft, Top:=mytop)
tempshape.Left = tempshape.Left - tempshape.Width
End Sub
示例代码3:'添加图片到页眉中的且右对齐
Sub AddPicturetoFooterToLeft()
Dim myleft, mytop
myleft = Activedocument.Sections(1).PageSetup.LeftMargin
mytop = Activedocument.Sections(1).PageSetup.PageHeight - Activedocument.Sections(1).PageSetup.BottomMargin
mytop = mytop + (Activedocument.Sections(1).PageSetup.BottomMargin - Activedocument.Sections(1).PageSetup.FooterDistance)
mytop = mytop - 11
Activedocument.Sections(1).Footers(wpsHeaderFooterPrimary).Shapes.Addpicture _
"C:tempafter.gif", Left:=myleft, Top:=mytop
End Sub
4. 注意事项
1. 如果通过“插入”、“页码”的形式插入了一个页码,则从“视图”、“页眉和页脚”进入视图时,光标默认会在页码的图文框中,这个可能会影响到用户通过API切换视图来编辑页眉与页脚的情况。

2. 页眉与页脚(包括正文)中插入图形时,ShapeRange的顺序与Shapes的顺序是不一样的。
通常应该使用Shapes来取最后一个插入的图形:
Activedocument.Sections(1).Headers(wpsHeaderFooterPrimary).Shapes(Activedocument.Sections(1).Headers(wpsHeaderFooterPrimary).Shapes.Count).Select
5. 参考
更多的API操作,请参阅 WPS API 帮助文档。
6. 适用范围
适用于 WPS Office 2009(1705)以上版本


