
Pxe无人值守安装centos系统
Pxe无人值守安装linux系统,能够对多台机器同时自动进行操作管理,减少管理员的工作负担,也使管理更加科学有效。因此pxe无人值守安装linux对于管理员来说有重大的意义。下面,就来介绍一下pxe的简单流程。
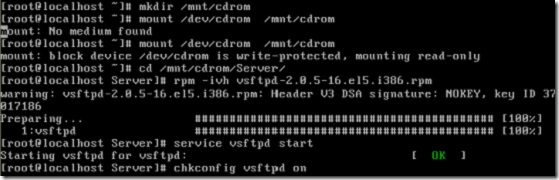
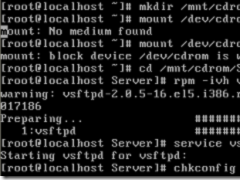
建立光盘挂载点
mkdir /mnt/cdrom
mount /dev/cdrom /mnt/cdrom
进入光盘server目录,安装vsftpd服务
cd /mnt/cdrom/Server/
rpm -ivh vsftpd-2.0.5-16.e15.i386.rpm
启动vsftpd
service vsftpd start
设置vsftpd开机自动启动
chkconfig vsftpd on
安装dhcp服务
rpm -ivh dhcp-3.0.5-21.e15.i386.rpm

启动dhcp服务
但是当前没有配置脚本,因此要先编辑配置脚本
进入脚本编辑界面
vi /etc/dhcpd.conf
输入:set nu 以显示行号
底行模式下 r /usr/share/doc/dhcp-3.0.5/dhcp.conf.sample(读取dhcp.conf.sample文件)


修改之后
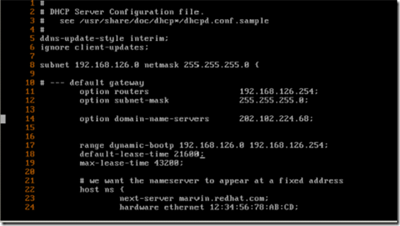
注:修改的主要是subnet 改为本地的网段,默认网关中的option routers,option subnet-mask,optiondomain-name-servers,其他的可以不用管。
现在dhcp可以启动了。。。
service dhcpd start

设置dhcp服务开机自启动

下面安装tftp server
先查看是否已经安装过了
Rpm -qa |grep tftp
我这里已经安装过了,要是没有安装的话执行下面指令安装
rpm -ivh tftp-server-0.49-2.i386.rpm

查看安装目录
rpm -ql tftp-server

通过/etc/xinetd.d/tftp说明tftp服务属于超级守护进程所控制的
所以设置开机自启动
编辑/etc/xinetd.d/ftp
vi /etc/xinetd.d/ftp
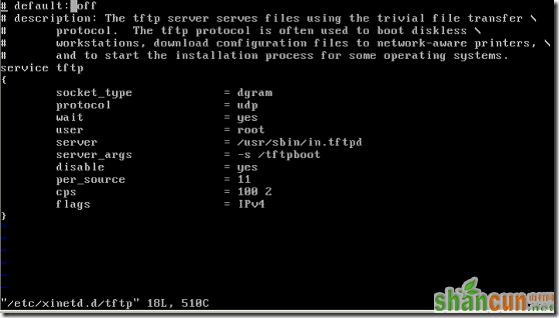
只需要把第disable =yes改为no(不唤醒改为唤醒)
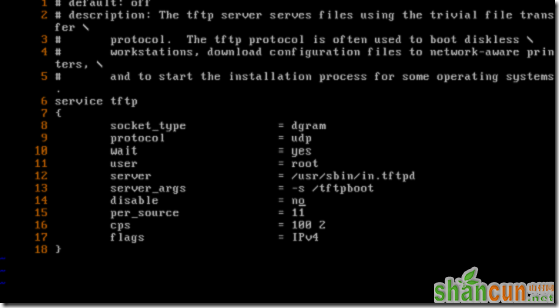
tftp开机自启动设置完成,:wq保存退出
重启超级守护进程,不然不会生效。。。
service xinetd restart

自此,三个服务器建好了,但是ftp服务器比较特殊,需要放置光盘镜像文件,那咱就把光盘文件拷上来。。。
返回到光盘根目录,
cd..
把光盘上的文件拷贝到 . var/ftp/pub/
cp -r(光盘中有目录,要用递归参数) .(.表示光盘根目录下所有) /var/ftp/pub/

光盘文件拷贝完之后,ftp的所有功能都具备了
在ftp上得到地址了,但再怎么知道tftp-server的地址呢
编辑dhcp.config文件

在这个文件中加入本地地址

返回到根目录
找到tftpboot目录

把启动的一些必要的东西(内核驱动等)放入里边
cd /tftpboot

把光盘中的initrd.img (驱动文件)和vmlinuz(内核文件)拷贝到当前目录

把/usr/lib/syslinux/pxelinux.0 的pxe的驱动文件也拷贝到当前目录

为pxelinux。0建立一个目录pxelinux.cfg(当系统调用pxelinux.0的时候必定要读取pxelinux.cfg目录下的配置文件default)
把isolinux.cfg拷贝到pxelinux.cfg命名为default


这里边是启动需要的东西

还有关键的一步,要实现pxe无人值守安装linux,要指明ks.cfg的位置。
产生ks.cfg
编辑default

里边有一项append(追加内核参数)

添加ks=ftp://192.168.126.30/ftp/pub/ks.cfg
保存退出:wq!
再次编辑 /etc/dhcpd.conf
vim /etc/dhcpd.conf
在default gateway中加入信息
filename “pxelinux.0”

把ks.cfg文件拷贝到 /var/ftp/pub
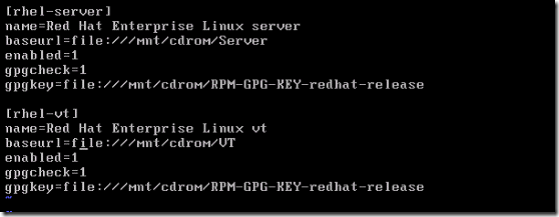
编辑 /etc/yum.repos.d rhel-debuginfo.repo
vim /etc/yum.reppos.d rhel-debuginfo.repo
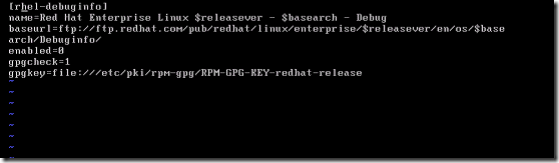
修改之后。。。
安装yum工具
yum install system-config-kickstart
然后通过ssh连上linnux。。。(整日看黑底白字,感觉很是不爽,偶尔调节一下。。。)
system-config-kickstart
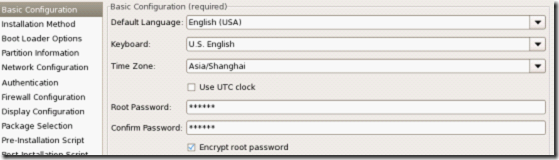
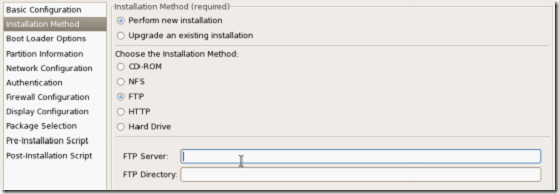
这个里边ftp server 192.168.126.30 ftp Directory /pub
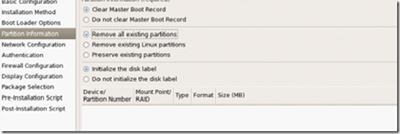
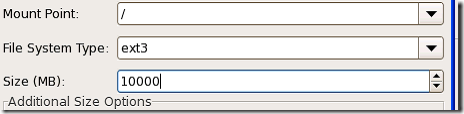
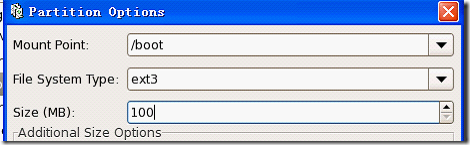
然后新建分区,
网络配置选择自动获得ip地址
firewall 干掉。。。
嗯,搞定了吧,然后记得保存。
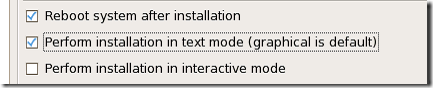
但是,但是,我们用的linux没有序列号把,你要实现无人看管情况下安装,万一他让你输入序列号,但是你人却不在,那。。。系统估计就在那里休息了吧。。。
所以在ks.cfg 中加入以下命令

为了保险起见,重启各种服务器吧。。
Service dhcpd restart
Service xinetd restart
Service vsftpd restart
好了。
重启系统。


