PS给照片添加浪漫色调教程原图
 nmousewheel="return bbimg(this)" onload="javascript:resizepic(this)" border="0"/>
最终效果图 nmousewheel="return bbimg(this)" onload="javascript:resizepic(this)" border="0"/>
1.打开图片,复制一层(只是个人习惯),进入通道面板,选择蓝色通道。
 nmousewheel="return bbimg(this)" onload="javascript:resizepic(this)" border="0"/>
 nmousewheel="return bbimg(this)" onload="javascript:resizepic(this)" border="0"/>
2.执行“图像/应用图像”,参数如图。
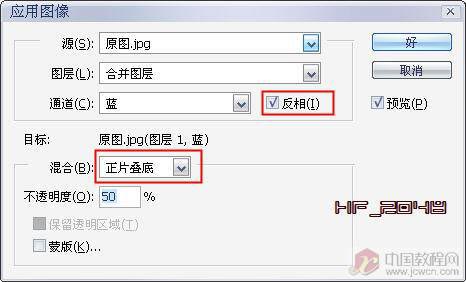 nmousewheel="return bbimg(this)" onload="javascript:resizepic(this)" border="0"/>
 nmousewheel="return bbimg(this)" onload="javascript:resizepic(this)" border="0"/>
3.再选绿通道,执行“图像/应用图像”,参数如图。
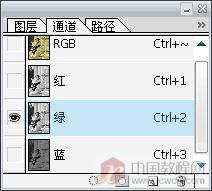 nmousewheel="return bbimg(this)" onload="javascript:resizepic(this)" border="0"/>
 nmousewheel="return bbimg(this)" onload="javascript:resizepic(this)" border="0"/>
 nmousewheel="return bbimg(this)" onload="javascript:resizepic(this)" border="0"/>
4.回到图层面板,点击面板下面的“创建新的调整图层”按钮,选择“色阶”。色阶参数如图(注:要对各通道进行色阶调整,这个很不好把握,要靠自己慢慢试调了)。添加调整图层的好处是觉得效果不好可以随时改动,而且还可以利用蒙板。
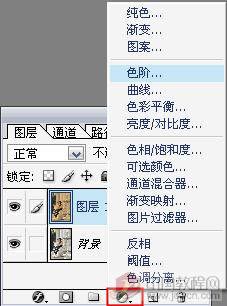 nmousewheel="return bbimg(this)" onload="javascript:resizepic(this)" border="0"/>
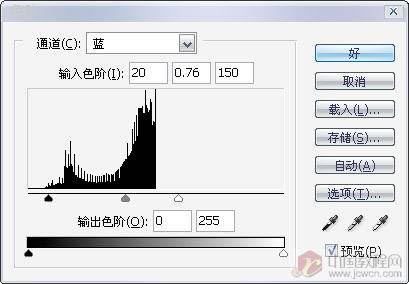 nmousewheel="return bbimg(this)" onload="javascript:resizepic(this)" border="0"/>
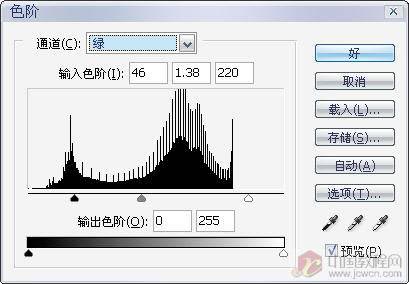 nmousewheel="return bbimg(this)" onload="javascript:resizepic(this)" border="0"/>
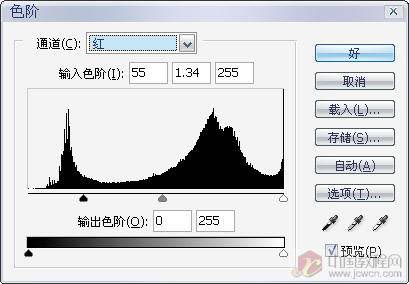 nmousewheel="return bbimg(this)" onload="javascript:resizepic(this)" border="0"/>
 nmousewheel="return bbimg(this)" onload="javascript:resizepic(this)" border="0"/>
5.再添加一个“亮度/对比度”调整层,参数如图。增加对比使明暗更突出。
 nmousewheel="return bbimg(this)" onload="javascript:resizepic(this)" border="0"/>
 nmousewheel="return bbimg(this)" onload="javascript:resizepic(this)" border="0"/>
6.最后添加个“色相/饱和度”调整层,适当增加点饱和度,使画面更鲜艳。
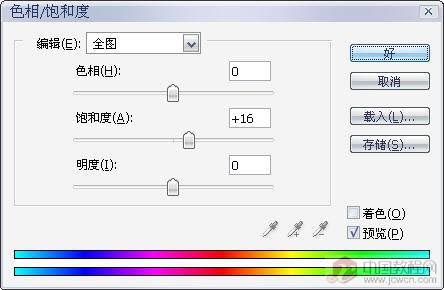 nmousewheel="return bbimg(this)" onload="javascript:resizepic(this)" border="0"/>
 nmousewheel="return bbimg(this)" onload="javascript:resizepic(this)" border="0"/>
最终效果图:
 nmousewheel="return bbimg(this)" onload="javascript:resizepic(this)" border="0"/>


