教程介绍比较冷酷的蓝色调色方法。大致过程先用调色工具调成大致的蓝色系,然后把图片的整体色调调暗,最后就是加强人物肤色的质感
原图:
 nmousewheel="return bbimg(this)" onload="javascript:resizepic(this)" border="0"/>
最终效果:
 nmousewheel="return bbimg(this)" onload="javascript:resizepic(this)" border="0"/>
1、打开原图素材,按Ctrl + J 把背景图层复制一层。
 nmousewheel="return bbimg(this)" onload="javascript:resizepic(this)" border="0"/>
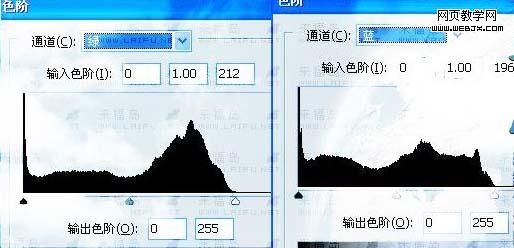
2、执行:图层 > 新建调整图层 > 色阶,参数设置如下图。
 nmousewheel="return bbimg(this)" onload="javascript:resizepic(this)" border="0"/>
 3、新建一个图层,按Ctrl + Alt + Shift + E 盖印图层。
 nmousewheel="return bbimg(this)" onload="javascript:resizepic(this)" border="0"/>
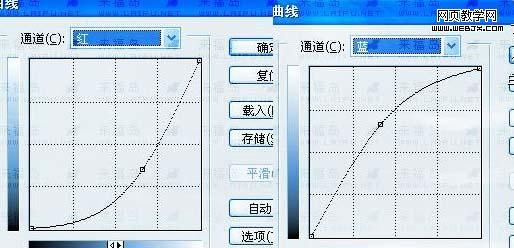
4、执行:图层 > 新建调整图层 > 曲线,参数设置如下图。
 nmousewheel="return bbimg(this)" onload="javascript:resizepic(this)" border="0"/>
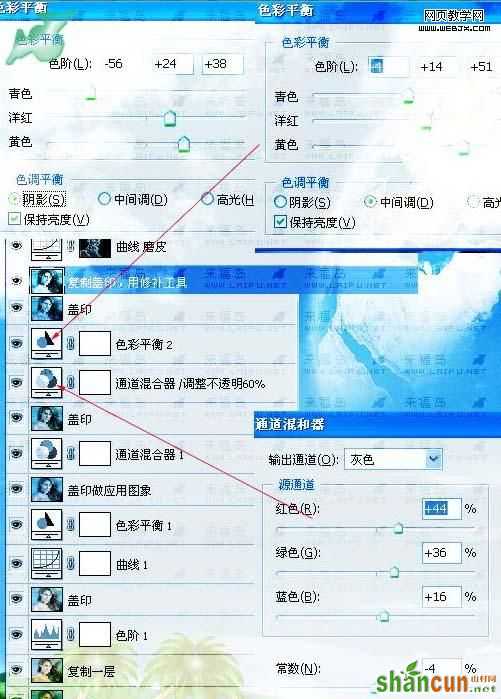
5、执行:图层 > 新建调整图层 > 色彩平衡,3lian素材,图层 > 新建调整图层 > 通道混合器,参数设置如下图。
 nmousewheel="return bbimg(this)" onload="javascript:resizepic(this)" border="0"/>
 6、执行:图层 > 新建调整图层 > 通道混合器,图层 > 新建调整图层 > 色彩平衡,参数设置如下图。
 nmousewheel="return bbimg(this)" onload="javascript:resizepic(this)" border="0"/>
7、新建一个图层盖印图层,复制一层,用修补工具修补下人物。最后执行:图层 > 新建调整图层 > 曲线,对人物磨皮,当然你也可以用自己的方法磨皮,完成最终效果。
 nmousewheel="return bbimg(this)" onload="javascript:resizepic(this)" border="0"/>


