怀旧色的调色方法有很多。主色调一般都是淡黄色。也可以按自己的喜好加上一些辅助色。调色的时候不一定要按照作者的参数去调。只要效果接近,用什么方法都可以。
原图 nmousewheel="return bbimg(this)" onload="javascript:resizepic(this)" border="0"/>
最终效果 nmousewheel="return bbimg(this)" onload="javascript:resizepic(this)" border="0"/>
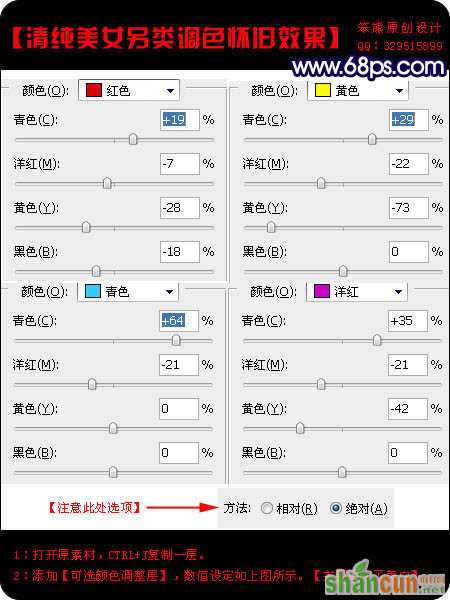
1、打开原图素材,按Ctrl + J 把背景图层复制一层。
2、创建可选颜色调整图层,参数设置如下图。
 nmousewheel="return bbimg(this)" onload="javascript:resizepic(this)" border="0"/>
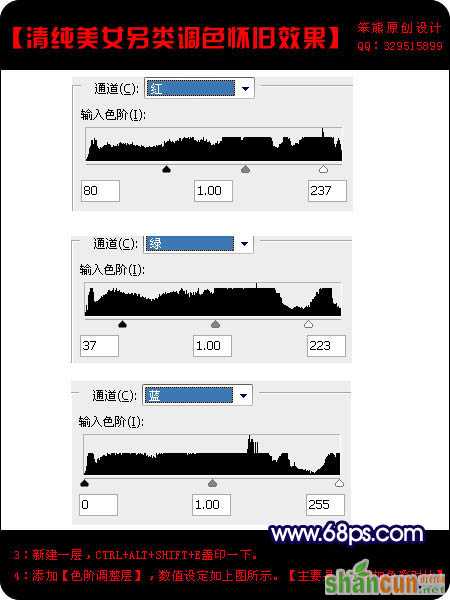
3、新建一个图层,按Ctrl + Alt + Shift + E 盖印图层。
4、创建色及调整图层,参数设置如下图。
 nmousewheel="return bbimg(this)" onload="javascript:resizepic(this)" border="0"/>
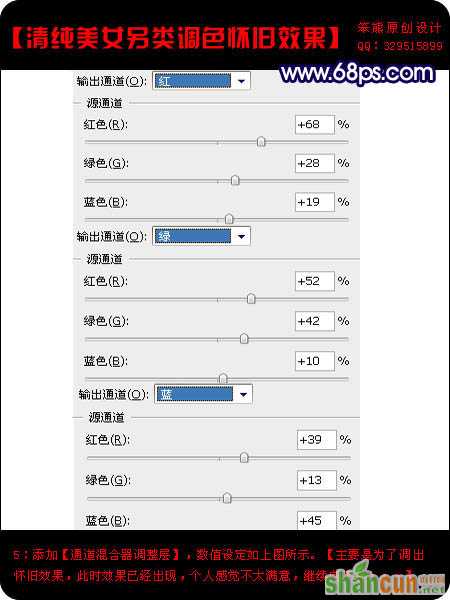
5、创建通道混合器调整图层,3lian素材,参数设置如下图。目的是为了调出怀旧的效果。
 nmousewheel="return bbimg(this)" onload="javascript:resizepic(this)" border="0"/>
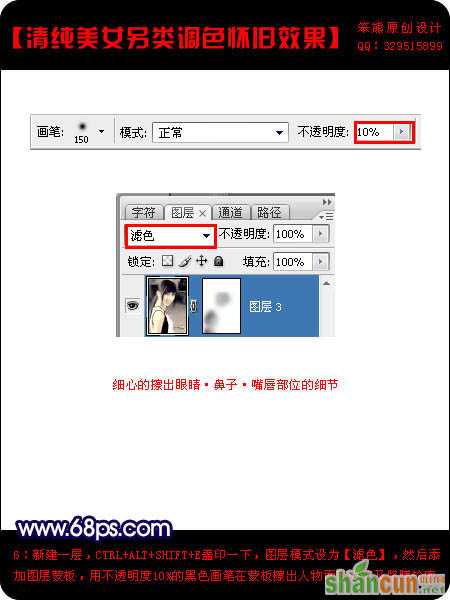
6、新建一个图层,盖印图层。图层混合模式改为“滤色”,加上图层蒙版,用透明度为10%的画笔把人物的脸部及皮肤部分擦出来。
 nmousewheel="return bbimg(this)" onload="javascript:resizepic(this)" border="0"/>
7、新建一个图层,填充颜色:#2c2e2e,图层混合模式改为“滤色”。然后再加上一些抽丝图案,完成最终效果。
 nmousewheel="return bbimg(this)" onload="javascript:resizepic(this)" border="0"/>
最终效果:
 nmousewheel="return bbimg(this)" onload="javascript:resizepic(this)" border="0"/>


