快速制作古典黄金字教程——最终效果图
 nmousewheel="return bbimg(this)" onload="javascript:resizepic(this)" />
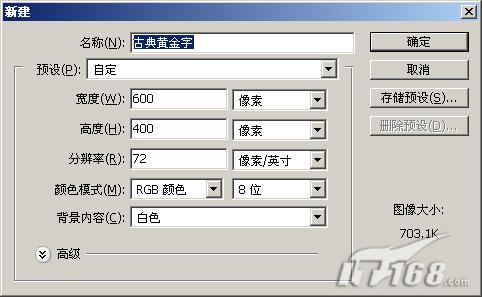
1.启动Photoshop CS2中文版,按Ctrl+N打开“新建”对话框,输入名称“古典黄金字”,将大小设置为600x400像素,分辨率设置为72像素/英寸,如图1所示,然后单击“确定”按钮。
 nmousewheel="return bbimg(this)" onload="javascript:resizepic(this)" />
图1
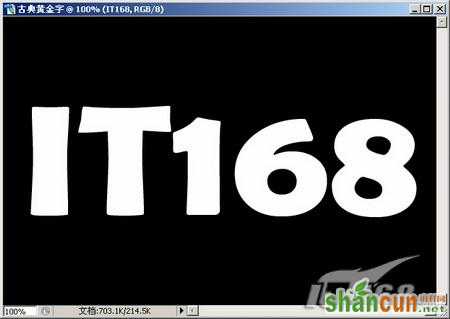
2.按D键将前景色和背景色恢复到默认的黑色与白色,然后按Alt+Del使用黑色的前景色填充背景图层。选择工具箱中的“横排文字工具”,输入文字,将文字的颜色设置为白色,并设置为较粗的字体,如图2所示。
 nmousewheel="return bbimg(this)" onload="javascript:resizepic(this)" />
图2
3.选择菜单命令“图层|图层样式|内发光”,打开“图层样式”对话框,按如图3所示设置内发光图层样式。其中发光颜色的数值为473902。 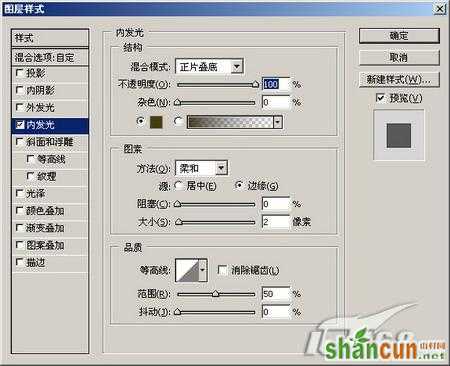 nmousewheel="return bbimg(this)" onload="javascript:resizepic(this)" />
图3
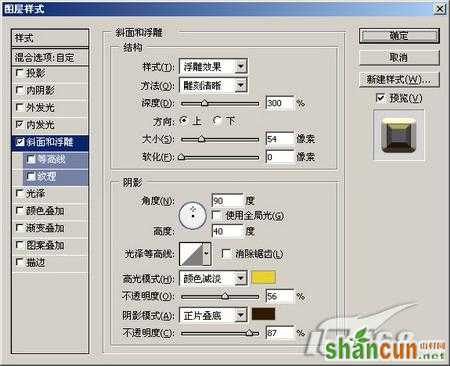
4.再按如图4所示设置“斜面和浮雕”图层样式。其中“高光模式”最右侧的颜色(即高光色)设置为f2ce02,“阴影模式”最右侧的颜色(即阴影色)设置为2e1201。
 nmousewheel="return bbimg(this)" onload="javascript:resizepic(this)" />
图4
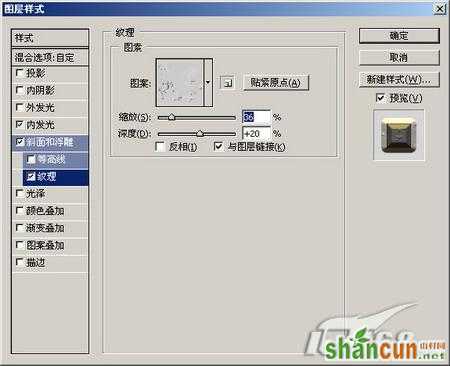
5.按如图5所示设置“纹理”图层样式。
 nmousewheel="return bbimg(this)" onload="javascript:resizepic(this)" />
图5
 nmousewheel="return bbimg(this)" onload="javascript:resizepic(this)" />
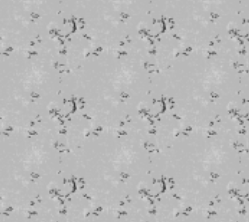
纹理素材
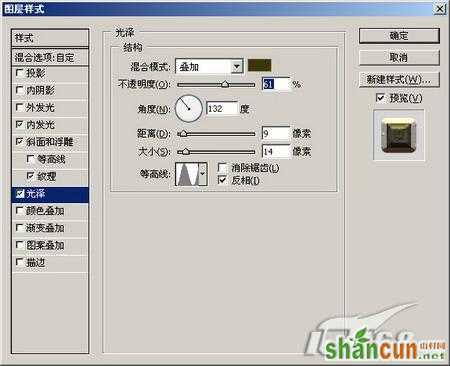
6.按如图6所示设置“光泽”图层样式,其中“混合模式”右侧的颜色设置为3c3301。
 nmousewheel="return bbimg(this)" onload="javascript:resizepic(this)" />
图6
7.按如图7所示设置“图案叠加”图层样式。 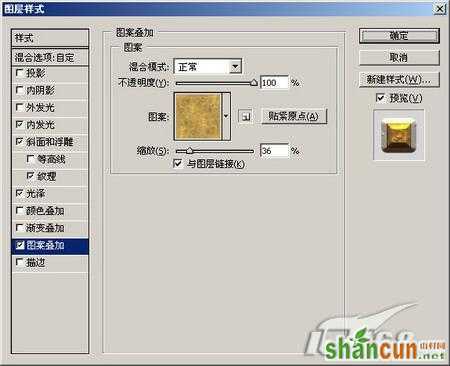 nmousewheel="return bbimg(this)" onload="javascript:resizepic(this)" />
图7
 nmousewheel="return bbimg(this)" onload="javascript:resizepic(this)" />
素材图片
8.设置完这些图层样式后,单击“确定”按钮,就可以看到如图8所示的最终效果了。 nmousewheel="return bbimg(this)" onload="javascript:resizepic(this)" />
图8
保存为PSD格式的文件,以后要用时,只需要将文字及字体改一下即可,例如可以改成如图9所示的“猪年大吉”。 nmousewheel="return bbimg(this)" onload="javascript:resizepic(this)" />
图9
再来一个——真是太方便了,如图10! nmousewheel="return bbimg(this)" onload="javascript:resizepic(this)" />
图10


