
PS制作线框艺术字教程
最终效果 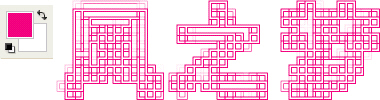 nmousewheel="return bbimg(this)" onload="javascript:resizepic(this)" border="0"/>
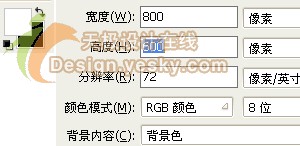
1.打开Photoshop ,将“前/背景色”设为白/黑,在后新建一个大小为800×600像素的文件,背景内容为“背景色”。
 nmousewheel="return bbimg(this)" onload="javascript:resizepic(this)" border="0"/>
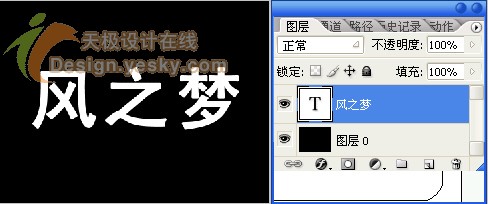
2.利用“文字工具”输入文字“风之梦”,然后把“背景层”解锁后,将文字层与画布层合并(Ctrl+E)。
提示:字体可以用黑体或较粗的字体。
 nmousewheel="return bbimg(this)" onload="javascript:resizepic(this)" border="0"/>
3.然后执行菜单中“滤镜/像素化/马赛克”命令,设置其值为16(马赛克参数可以自行调整,以看得到小方块为标准)。
 nmousewheel="return bbimg(this)" onload="javascript:resizepic(this)" border="0"/>
4.执行菜单中“滤镜/风格化/照亮边缘”命令,参数为5,5,1,效果如下图所示。
 nmousewheel="return bbimg(this)" onload="javascript:resizepic(this)" border="0"/>
5.执行菜单中“滤镜/风格化/查找边缘”命令,效果如下。
 nmousewheel="return bbimg(this)" onload="javascript:resizepic(this)" border="0"/>
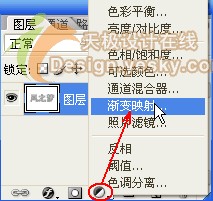
6.设置前景色为粉色,背景色为白色,单击“图层面板”下方的“图层调整按钮”,选择“渐变映射”后文字就变成了粉色外框。
 nmousewheel="return bbimg(this)" onload="javascript:resizepic(this)" border="0"/>
7.将图层合并,然后执行菜单中“选择/色彩范围”命令,用吸管选取空白的地方,对除文字外的空白处进行选择,效果如下。
nmousewheel="return bbimg(this)" onload="javascript:resizepic(this)" border="0"/>
 nmousewheel="return bbimg(this)" onload="javascript:resizepic(this)" border="0"/>
8.按下Delete键删除选区,形成效果1,按Ctrl+D取消选区,如效果2所示。
 nmousewheel="return bbimg(this)" onload="javascript:resizepic(this)" border="0"/>
9.用“魔棒工具”点选这些空格相应的地方进行填充,打造出漂亮的线框字,新建一个层填充白色为背景即可,最后效果如下。
nmousewheel="return bbimg(this)" onload="javascript:resizepic(this)" border="0"/>


