
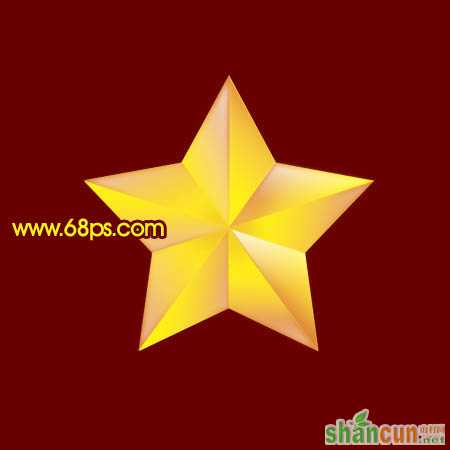
最终效果
 nmousewheel="return bbimg(this)" onload="javascript:resizepic(this)" border="0"/>
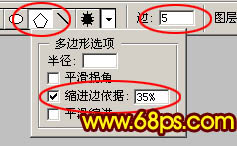
1、新建一个800 * 800像素的文件,背景填充颜色:#680000,把前景颜色设置为:#FCEB1F,然后选择多边形工具,参数设置如图1。
 nmousewheel="return bbimg(this)" onload="javascript:resizepic(this)" border="0"/>
<图1>
2、按Ctrl + R 调出标尺,用选择工具拉两条相交的参照线,然后以参照线的中心拉出下图所示的五角星。
 nmousewheel="return bbimg(this)" onload="javascript:resizepic(this)" border="0"/>
<图2>
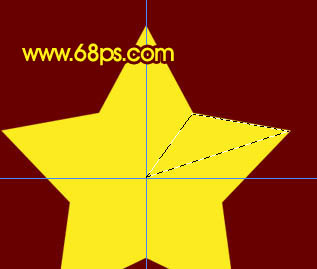
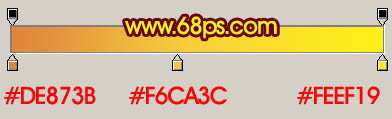
3、新建一个图层,用钢笔勾出图3所示的选区,选择渐变工具,颜色设置如图4,拉出图5所示的线性渐变。拉好渐变后不要取消选区。
 nmousewheel="return bbimg(this)" onload="javascript:resizepic(this)" border="0"/>
<图3>
 nmousewheel="return bbimg(this)" onload="javascript:resizepic(this)" border="0"/>
<图4>
 nmousewheel="return bbimg(this)" onload="javascript:resizepic(this)" border="0"/>
<图5>
4、保持选区,新建一个图层,选择菜单:选择 > 修改 > 收缩,数值为1,确定后填充白色,然后加上图层蒙版,用黑白线性渐变拉出透明效果,如图7。
 nmousewheel="return bbimg(this)" onload="javascript:resizepic(this)" border="0"/>
<图6>
 nmousewheel="return bbimg(this)" onload="javascript:resizepic(this)" border="0"/>
<图7>
5、同样的方法制作其它的立体面,效果如图8,9。
 nmousewheel="return bbimg(this)" onload="javascript:resizepic(this)" border="0"/>
<图8>
nmousewheel="return bbimg(this)" onload="javascript:resizepic(this)" border="0"/>
<图9>
6、新建一个图层,用钢笔勾出图10所示的选区,填充颜色:#FFF9A7,效果如图11。
nmousewheel="return bbimg(this)" onload="javascript:resizepic(this)" border="0"/>
<图10>
 nmousewheel="return bbimg(this)" onload="javascript:resizepic(this)" border="0"/>
<图11>
7、新建一个图层,3lian素材,用画笔点上几个白点,效果如下图。
 nmousewheel="return bbimg(this)" onload="javascript:resizepic(this)" border="0"/>
<图12>
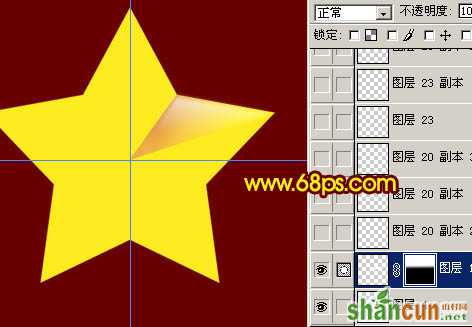
8、把背景图层影藏,然后在图层的最上面新建一个图层,按Ctrl + Alt + Shift + E 盖印图层,如下图。
 nmousewheel="return bbimg(this)" onload="javascript:resizepic(this)" border="0"/>
<图13>
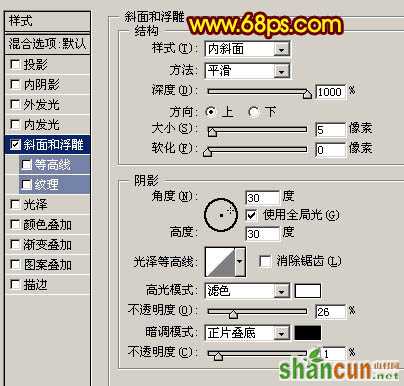
9、创建盖印图层,调出图层样式,选择斜面与浮雕,参数设置如图14,确定后把背景图层显示出来,效果如图15。
 nmousewheel="return bbimg(this)" onload="javascript:resizepic(this)" border="0"/>
<图14>
 nmousewheel="return bbimg(this)" onload="javascript:resizepic(this)" border="0"/>
<图15>
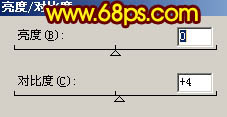
10、在图层的最上面创建亮度/对比度调整图层,参数设置如图16,效果如图17。
 nmousewheel="return bbimg(this)" onload="javascript:resizepic(this)" border="0"/>
<图16>
 nmousewheel="return bbimg(this)" onload="javascript:resizepic(this)" border="0"/>
<图17>
11、最后调整下细节,3lian.com,适当加上背景颜色,完成最终效果。
nmousewheel="return bbimg(this)" onload="javascript:resizepic(this)" border="0"/>
<图18>


