最终效果图 nmousewheel="return bbimg(this)" onload="javascript:resizepic(this)" border="0"/>
 nmousewheel="return bbimg(this)" onload="javascript:resizepic(this)" border="0"/>
1.新建文件,使用矩形选区工具绘制一个矩形按钮,前景色设置为#990000 ,背景色设置为#660000,选择反射渐变工具,填充,并使用自由变换工具对按钮进行扭曲。效果如下:
 nmousewheel="return bbimg(this)" onload="javascript:resizepic(this)" border="0"/>
2.选择按钮底层,调出选区,将选区缩进5个像素(选择-修改-缩小)。新建层,命名为按钮皮肤。按下X键将前景色和背景色进行调换。依旧选择渐变工具从上到下进行渐变。
 nmousewheel="return bbimg(this)" onload="javascript:resizepic(this)" border="0"/>
3.执行滤镜——杂色——添加杂色,数量:15.54,分布:高斯分布。如下图:
 nmousewheel="return bbimg(this)" onload="javascript:resizepic(this)" border="0"/>
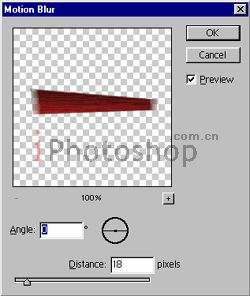
4.再执行滤镜——模糊——动感模糊,角度:0,距离:18像素,还有图层样式中的阴影及外发光,参数如下设置:
 nmousewheel="return bbimg(this)" onload="javascript:resizepic(this)" border="0"/>
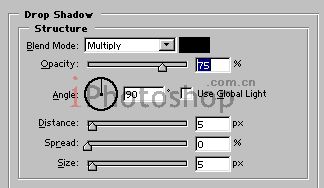
图层样式中的阴影,参数如下设置:
 nmousewheel="return bbimg(this)" onload="javascript:resizepic(this)" border="0"/>
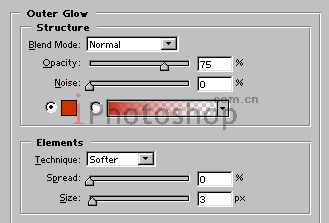
图层样式中的外发光,参数如下设置:
 nmousewheel="return bbimg(this)" onload="javascript:resizepic(this)" border="0"/>
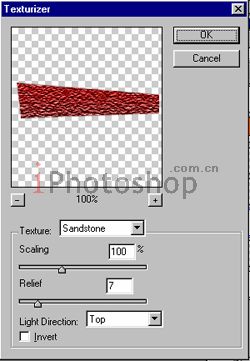
5.点击滤镜-纹理-纹理化,参数如下进行设置:
 nmousewheel="return bbimg(this)" onload="javascript:resizepic(this)" border="0"/>
最终效果就出来了~你可以自己在上面添加文字
 nmousewheel="return bbimg(this)" onload="javascript:resizepic(this)" border="0"/>
另一个效果:)希望你也能做出自己的木风格按钮
 nmousewheel="return bbimg(this)" onload="javascript:resizepic(this)" border="0"/>


