最终效果
 nmousewheel="return bbimg(this)" onload="javascript:resizepic(this)" border="0"/>
第一步:使用圆角矩形制作一个红色的矩形。
 nmousewheel="return bbimg(this)" onload="javascript:resizepic(this)" border="0"/>
第二步:然后我们给该矩形形状添加下面图层样式,阴影:
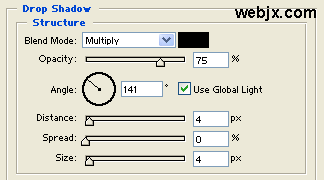 nmousewheel="return bbimg(this)" onload="javascript:resizepic(this)" border="0"/>
内发光:
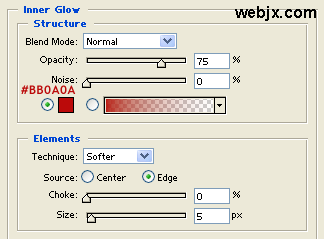 nmousewheel="return bbimg(this)" onload="javascript:resizepic(this)" border="0"/>
渐变叠加:
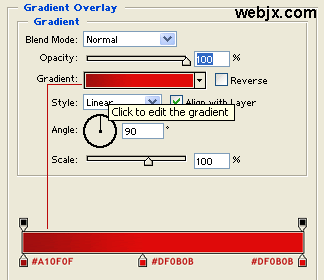 nmousewheel="return bbimg(this)" onload="javascript:resizepic(this)" border="0"/>
描边:
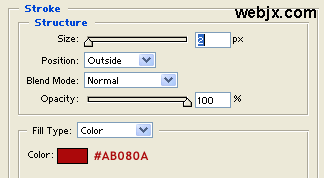 nmousewheel="return bbimg(this)" onload="javascript:resizepic(this)" border="0"/>
效果如下:
 nmousewheel="return bbimg(this)" onload="javascript:resizepic(this)" border="0"/>
第三步:按住Ctrl单击按钮层选择,使用使用矩形选框工具设置如下。
 nmousewheel="return bbimg(this)" onload="javascript:resizepic(this)" border="0"/>
第四步:使用矩形选框工具把选区移动到左部,如下图所示。
 nmousewheel="return bbimg(this)" onload="javascript:resizepic(this)" border="0"/>
第五步:创建一个新层,然后填充#E1CA57。
 nmousewheel="return bbimg(this)" onload="javascript:resizepic(this)" border="0"/>
第六步:在新建的层中添加图层样式,3lian素材,内发光:
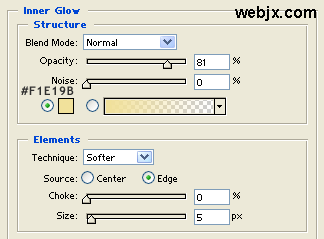 nmousewheel="return bbimg(this)" onload="javascript:resizepic(this)" border="0"/>
渐变叠加:
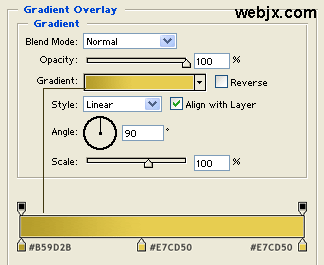 nmousewheel="return bbimg(this)" onload="javascript:resizepic(this)" border="0"/>
第七步:创建新层,然后放大到1600%,然后使用铅笔工具创建下面图形,很简单的!
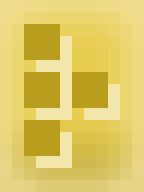 nmousewheel="return bbimg(this)" onload="javascript:resizepic(this)" border="0"/>
现在我们的按钮出现下面的形状了。
 nmousewheel="return bbimg(this)" onload="javascript:resizepic(this)" border="0"/>
第八步:加上文字,在这里我设置的Trebuchet MS英文字体、加粗、大小14pt、白色。当然你也可以在字上添加一些你认为好的效果。
 nmousewheel="return bbimg(this)" onload="javascript:resizepic(this)" border="0"/>


